If you are a fan of the Instant Pot, or aka a Pothead, you have probably heard the rumors going around about the Instant Pot Vortex Plus 7-in-1 Air Fryer Oven. The moment I found out about the soft sell (and this is actually a technique of advertising that uses subtle persuasion and and low key campaigning, and let me tell you, it worked on this gullible gal!) I searched ever Walmart location until I found one that was carrying it and like an iPhone sale on Black Friday I snatched that box right up and the moment I got home I did an Unboxing video which you can view here. Of course the next step was to actually try it out. I will be posting videos and recipes soon, but I wanted to write a quick initial review of the first few times using it.
**Important Info- I am not sponsored nor have I received any money for trying this product. Instant Pot did not send me one to try out. I heard about the Vortex Plus online and drove quite a long way to NJ through the Lincoln Tunnel to buy one.**
Accessories for the Vortex Plus
In my unboxing video you can see how easy it is to set up out of the box and I show you each of the accessories it comes with. No tools necessary and they bring all the accessories you need to start cooking. The accessories included are:
- Drip Tray– it is aluminum and coated with Teflon (PTFE) for easy cleaning. (If you do not cook with anything that has Teflon or non-stick coating, this might not be the appliance for you. The instructions say not to use any accessories that don’t come with this appliance, so until they come out with non-Teflon coated accessories, this won’t work.)
- 2 Cooking Trays– These are also non-stick. I like how it comes with 2 trays and not just one. I was able to fit 4 large slices of bacon or 4 slices of regular white bread on 1 tray.

- Rotisserie Spit– This is the long skewer and prongs used to make Chicken or a Roast.

- Rotisserie Cage– This is my favorite accessory. It is a round cage that attaches to the turner on the inside of the Vortex Plus and spins. This allows you to add food like fries, shrimp, or chicken wings (which I made from frozen and they were delicious!) and it will rotate while it Air Fries so that all sides of the food get evenly cooked without you having to stop the cooking to flip the food, mimicking regular frying technique because the food is being cooked on all sides at the same time.

- Rotisserie Remover– I’m not sure what this is called, but it’s a large metal fork that you use to remove the Rotisserie Cage or the Rotisserie Spit once the food is done cooking.
 **My first negative review.** I noticed the coating on the Fork has come off and the metal underneath has rusted. I have not used this accessory so this must have happened in the factory. I intend to reach out to the company about this and I will update you on it.
Vortex Plus Instruction Manual
The manual is not very detailed at all. It has enough information to get you started, (which I guess is why they call it a Getting Started Guide) but even though I don’t like manuals the size of encyclopedias, this one I felt was lacking a lot of information. It does include the dimensions and pertinent information about the appliance itself which is good.
**Update: Click here for the PDF of the entire complete manual for the Vortex Plus. It is more in depth than the one that comes in the box.

Initial Cooking Test with the Vortex Plus
The first thing I cooked with the Vortex Plus was bacon. My family loves crispy bacon, but I usually refrain from making it regularly because of the mess, time, and grease. I usually cook my bacon in the oven to keep down on the splatter you get from a pan. I always found this to be the best way to get really crispy bacon. However, it takes quite a bit of time (20 – 25 mins plus the time it takes for the oven to preheat)) and I though it’s great for large batches of bacon, using a baking sheet for just a few slices is a pain especially to clean. I thought if I could use the Air Fryer mode to cook crispy bacon without a lot of mess and time, this would be the best way to test the efficiency and worth of this appliance.
The Vortex Plus has a preheating feature built in. I pressed Airfry and set it for 5 mins.
When you press any function and “START” (I used the Airfry function as you can see int he photo below) the Vortex will say “ON” and then preheat the Oven. Once it is done preheating it will display “ADD FOOD” and that is when you add the tray. It took 2 mins to preheat before it told me to add the food.

While it was preheating I got the bacon ready. I started with one tray of regular Oscar Mayer bacon. I could fit 4 slices of the thick cut bacon on one tray (I decided to make one tray first just to test it out).
When the Vortex was done preheating, it beeped and displayed “ADD FOOD”. I opened the door and added the tray in the middle position. As soon as you close the door the oven begins again and starts to count down.
Once it is done cooking, it beeps and displays “COOL DOWN” for a few seconds. Then it turns off and you can take out the food.
The total time from start to finish was 7 mins (2 mins preheating and 5 mins air frying) and the bacon came out amazing! Very crispy and not greasy. All the grease dripped down below and collected in the drip tray. Once it cooled I was able to clean it in my sink with just a sponge and dish detergent.


(After this test run, I tried making 2 trays of bacon, one tray on the top and the other tray int he middle. The only difference is that I set the timer to 10 mins and half way through, the Vortex instructed me to turn the food. I switched the position of the trays because I could see since the heating element and fan is at the top, it cooks the top tray quicker than the bottom. Both trays of bacon came out crispy, but I did have to make sure the top tray didn’t burn.)
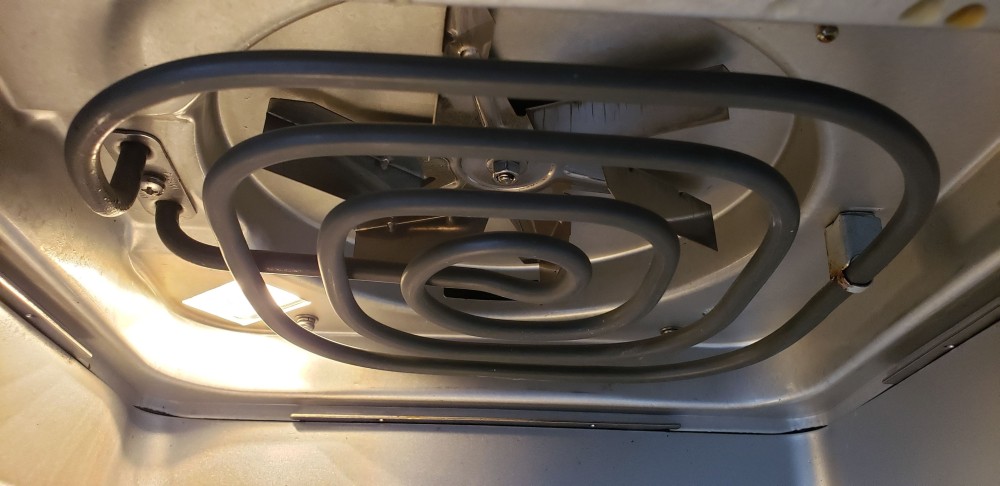
Cleaning the Vortex Plus
Cleaning the Vortex Plus Oven was pretty easy. I used a damp Norwex cloth (you can use a sponge or a dish cloth) to just wipe down the inside of the oven. Here is a picture of the cleaned inside after I cooked bacon, wings, and toast. 
The trays and drip pan can be cleaned with just soapy water and a sponge. They have a very good non-stick coating that cleans easily.
One tip: The Instruction Manual says you can cover the drip tray with foil for easier cleaning. I haven’t found this necessary, but it’s a good tip.
The Rotisserie Cage I thought would be a pain to clean. At first I was just using a sponge, and it took quite a bit of scrubbing. However, I realized that my kitchen brush did a much better job and once I switched to using that, it cleaned much easier. So I would recommend if you are going to use the Cage often, get a cheap kitchen scrub brush. It works great!
Last, but not least, my favorite feature for cleaning was the Removable Door. I have a great toaster oven, but it drives me crazy how the crumbs always get between the oven and the door and are impossible to get out. With the Vortex Plus, you can actually remove the door so not only can you get any crumbs the get in between the door and the oven, but it makes it easier to clean the inside as well.
**This is my second negative critique.** The instruction manual does not have instructions on how to remove the door! I tried lifting, pulling, looking for a latch, but I could not figure it out. I was scared to pull too hard for fear of breaking it. So I had to resort to calling my husband to come help me. After a few minutes of both of us trying, we figured out the trick.
To remove the door, you need to open the door about half way and then pull up on the left side of the door to jimmy it out. Once you get the hang of it, it’s easy to do, but boy was it an exercise in futility and patience for the first 20 mins trying to figure it out.
**I will be sure to show you how to remove the door in my video review so you won’t want to thrown the thing out the window like I was tempted to do.**
All in all I really like this oven so far. I will have to make a few more things to really get the hand of it, but I see it as a great addition to my kitchen!


Thanks for the detailed info! It’s super helpful on this new product 🙂 How would you say the toast came out? Thats the only thing keeping me from jumping on the bandwagon right away and replacing my toaster oven.
LikeLike
You are so welcome! If you are a big toast person I don’t think it is as good as a toaster oven for that. The heating element is at the top so even though it browns really well ad toasts the bread great, it only browns one side. You would have to flip the toast after 2 mins to brown the other side. That said, it’s great for bagels and english muffins and if you are ok with toast not being brown on the other side (still crunchy just not color) then it’s not going to do that for you. Or at least I haven’t found a way yet.
LikeLike
I just did english muffins and they were better than coming out of a toaster. Although I haven’t tried toast yet, I just read elsewhere where one person said 3 mins @ 400, no butter, no flipping works for her and another said butter both sides, broil @ 380 on middle rack for a few mins. I will be experimenting. lol
LikeLike
Thank you so much for your detailed information. I am still on the fence whether I want the Vortex or not. I have read a lot on the facebook pages and have yet to see anything on the following question:
Are the trays, drip pan, and the rotisserie cage dishwasher safe?
LikeLike
You are so welcome! They are all dishwasher safe. ❤
LikeLike
Thank you and I finally saw the post where someone posted the link to the actual manual, not just what was included in with the Vortex. That was helpful as well.
LikeLike
Yes, all but the door
LikeLike
I am too..I always put it in my Walmart cart but have yet to checkout..
LikeLike
Does it get hot on the outside? I bought a Cuisinart convection oven I need to replace because I get burnt if I touch it. Can you bake in this? Thanks.
LikeLike
Hi. It says you can bake in it, but I haven’t tried just yet. I will see if it’s hot on the outside, since I didn’t notice.
LikeLike
You can bake but I haven’t tried that function yet. And it doesn’t get vey hot on the outside at all. Warm, but not hot. The front door and metal gets hotter than the sides but not enough to burn yourself like with my toaster oven.
LikeLike
I just ordered this for my son and son in law a housewarming gift, I was going to let them try it before I bought it for us but you sold me on the bacon! My husband loves bacon but hates to make it because of the mess.
What is the brush you use to clean it?
LikeLike
Hi! I used a produce brush. But you could use and dish scrub brush like from a dollar store.
LikeLike
Let us know if you can bake a dessert. I have a convection oven and small air fryer but what to convert to only one piece of equipment. Any suggestions?
LikeLike
I just converted my Cuban Rum Cake. It bakes amazing cakes and I an an avid baker. I was super surprised. I will be posting the tecipe and a video tomorrow.
LikeLike
It does not. It stays pretty cool even after operating for more than an hour at 400 degrees
LikeLike
Not hot at all. I just replaced a black and decker larger version for one of the same reasons because it was so hot to the touch. Not an issue with this at all.
LikeLike
The whole outside is warm to the touch, but the window gets HOT.
LikeLike
Thanks for sharing your review! I’m also on the fence to getting this to replace my cuisinart AF oven…. my only concern is, is the temperature in the vortex accurate when you use the bake function? Because mine runs way hotter then it should… so baking things in our cuisinart sucks. 🙁
Thanks again for sharing your experience and review with us. It’s very helpful much appreciated.
LikeLike
You are so welcome! I am an avid baker but I haven’t tried baking in it yet. Im thinking of doing my Cuban rum cake. I’ll make sure to post a review.
LikeLike
Are you able use the the Rotisserie Cage to make french fries from scratch? I make sweet potato fries from scratch all the time in my current air fryer, and while they come out great, having to take the basket out and shake it during the cooking process is annoying.
LikeLike
I haven’t tried yet, but I think you can. It doesn’t rotate vey fast so I think it would work. Im adding it yo my list of recipes to try.
LikeLike
Thanks for the response. I just noticed that there is a recipes for fries on the IP site, they use the basket. This is exactly what I’ve been wanting from an air fryer and the other features are great bonus…..mine will be delivered Monday.
LikeLike
I’m a dad. Do all my cooking. Cooked home fries for my twins this weekend using the basket. Came out really good. 12 minutes for delicious fries. Most of the seasoning came off the fries though from the tumbling action.
LikeLike
From the manual
For crispy, golden fries, soak fresh potato sticks in ice water for 15
minutes, pat dry and spray lightly with cooking oil before inserting them
to the oven.
LikeLike
I made home fries last night in mine w red skinned potatoes. 20 min air fry w basket and they were perfect. Seasoned only w drizzle of olive oil, season salt, pepper, and Greek seasoning.
LikeLike
Oh boy that sounds fantastic! Potatoes are on my list of things to try.
LikeLike
Now that sounds delicious!!!
LikeLike
Hi Lana, I saw your unboxing, and thanks for this post. What’s the maximum temp it will go to? I use the no knead bread recipe and I bake my own bread in an Emile Henry casserole dish in the oven. It bakes at 450. I was wondering if I would be able to do this here. In a regular oven it cooks with a lid on for half an hour and then lid off for 15 minutes to give it some color.
LikeLike
Hi! I love baking, too. I haven’t used the Vortex yet to do so, but it’s on my list. The highest temperature it goes up to is 400 degree in all modes except Reheat (120-360 degree F) and Dehydrate (105-160 degree F). I have a glass 1.5 QT baking casserole dish and it fits just fine. I know the Emile Henry’s casseroles have a good size handle on each side but if you place the dish so the handles are diagonal in the oven it might work depending on the size. You can use any oven safe accessory in the Vortex as long as it fits. Hope this helps.
LikeLike
It appears Page 26 of the manual has instructions for removal and installation of the door.
LikeLike
You are absolutely right. I had bought it the day it came out and the link to the manual online wasn’t working. When I finally printed it out, it said to do exactly what took me 20 mins to figure out, lol.
LikeLike
Thank you for your detailed review!! I’m having a problem getting the door off. I tried lifting the left side and used your link to their instructions which says right side I believe, but I must not be getting at the correct angle or something because I cannot get the door off. I’m afraid of it breaking. I will check out your site further and see if I can find a video of you taking it off. Maybe that will help me to know how hard to pull to get it to release.
LikeLike
Hi. The first time taking the door off I’d the hardest. I was scared to break it as well. If you watch my video “Beginners Guide” at about the 4:30 mark I show you how to take the door off. Hoose this helps and come back and let me know. I👍😁
LikeLike
Nice review! I turn into a ‘gadgetholic’ whenever a new kitchen gadget is realeased, and to date, I have a few pressure cookers of varying capacities, a ninja foodi, and a Power xl airfryer oven, which has racks, rotisserie spit, rotisserie basket. All have been abandoned for my foodi. I’d like to give that instant pot airfryer a shot, but do I want to go back to having to use a separate pressure cooker and the ip airfyer? I can’t say I do.. lol
LikeLike
Lol, I hear ya. I’m not a gadget person sty all. Actually I bought my first IP for my husband. I definitely think if you have an air fryer you like and are used too, I agree it doesn’t make sense to get rid of it for this. I’ve never used the foodi but I know people who love it.
LikeLike
Thanks for review! I am interested, but don’t know much about air fryers. Someone told me it still uses oil, is that the case?
LikeLike
Most air fryers you add a little oil (like a spray) to help get the browning. SSI far with this one and what I have made, I have not added any oil.
LikeLike
Some air fryers say to spritz with a bit of oil to help get the browning effect. So far I haven’t had to add oil, but I’ve only done a handful of recipes.
LikeLike
Is there anything in the manual, or just based on your experience with, about how loud the unit is? Is the sound the same using the rotisserie as well as say doing bagels? Thank you 🙂
LikeLike
That’s a great question. On both the broil, reheat, and rotisserie it makes a hum similar to a microwave, maybe a tad bit louder. Not anything near as loud as the extractor fan on an oven though. In my next video I’ll make sure to get a good audio of the sound.
LikeLike
Thank you! 🙂
LikeLike
does this vortex actually make toast? like a toaster would? toasted on both sides, and would be good for heating up pizza rolls etc? I have teens that use toaster oven a lot for these things.. we have an air fryer but its hardly used, they prefer toaster oven
LikeLike
Hi. I have 2 teens as well. It toasts great but it only browns one side since the heating element is on the top. So you have to flip bread if you wanted toasted on both sides. However things like pizza rools, mini pizzas, and bagels do great.
LikeLike
Can you please tell me the dimensions of the baking pans it comes with? Are all of them slotted with holes? Thank You in advance
LikeLike
They ate about 8×9 and the 2 pans are both slotted. But you can cover with foil or user the drip pan as a tray.
LikeLike
When you do another video could you measure exactly? Teflon is a no go for our house, but I want to give the interwebs a try at replacements for both the drip and the slotted… thanks!
LikeLike
Absolutely. I’ll measure them and hey back to you. 👍😁
LikeLike
I measured it for you and it is 10 1/8 by 9.
LikeLike
Did you have any difficulty untwisting the cage..when you’re trying to get the food out? I felt like struggled a bit! 😫
LikeLike
Hi. No not at all. On the top of the lid there’s a picture of a lock to show you which way to twist it.
LikeLike
I use Ove Gloves and find it easy to untwist. I’ve seen a video where someone sits the bottom of the cage in a bowl so the lid is in an almost standing position. Not sure if this would help if you have to do it quickly.
LikeLike
Does the manual give required clearances need? Do you have a link to an online manual? Thanks
LikeLike
Hi. I have a link tot he PDF full manual here https://lanaunderpressure.com/2019/07/08/beginners-guide-to-the-instant-pot-vortex-plus/ It syas you need 5 inches clearance on all sides. Hope this helps.
LikeLike
Lana, thank you so much for all the info/recipes/videos on the IVP…..yesterday I made 2 Cornish Hens with the rotisserie feature (40 minutes on 350 degrees) , side by side, and they came out absolutely wonderful!
LikeLike
Oh wow that sounds fantastic. I didn’t know you could fit 2. Great idea! I’m going to try that. The first meal I ever made my husband back when we were in high school was cornish game hens.❤
LikeLike
Thanks for sharing your video. I know you’ve had it soon after it came out, but since seeing the Vortex mentioned, I’ve found lots of YouTube videos re taking off the door,… I just saw one for rotisserie chicken and they say it’s awesome. It sure looked good and I could hear how crisp it was when the woman bit into a wing. No telling how long we have to wait in Canada for them to be available. They won’t even give us an idea of the cost….and it’s been in Walmart about 2 months now and some locations have them on clearance for $70.
LikeLike
Hi. I’m so glad you liked my video. I know a few people who are waiting for it to come to Canada. I think it will show up soon. They already started selling them at Kohl’s so that means they are expanding. I have seen people posting Walmarts that are selling them at low prices but here in NY I have only seen it at the regular price. Hope you get one soon and thanks again for the kind words.
LikeLike
Just an update on availability in Canada. They did come out shortly after posting my previous comment, but unlike the US, Walmart here wasn’t stocking many. I have 5 local Walmarts and only saw 1 or none in their stores. Now they either don’t sell them or are sold out because you can’t buy them online either. Instant Pot”s site has none available. I was hoping to get a good deal on Black Friday but saw Best Buy had them $30 cheaper ($149) in the sale that ends today. Not sure if they will keep it at that price for BF but weirdly, they never made a big deal about carrying the product. Our price is a far cry from the reg. $119 in the US, which I’ve seen as low as $40 advertised at some Walmarts. As far as I know, Best Buy is the only place that carries them presently in Canada. So glad I scooped one!
LikeLike
I saw some reviews that people were complaining about the plastic inside the vortex was melting or they smelt some plastic burning when using the rotisserie basket. Have you experienced that? Is there really any plastic inside?
LikeLike
Hi. Yes the housing knob in the rotisserie is a high heat plastic. But I haven’t had any issues. I think the issue of it breaking eads when people went over the weight limit so it cracked because it couldn’t turn. The plastic smell is not plastic but styrofoam from people not cleaning it out before they use it. Small pieces of styrofoam burn and it is an awful smell. Just make sure to clean out all the styrofoam before turning it on.
LikeLike
Wow! That’s a quick reply. Thanks!! I’m about to place an order of it taking advantage of Black Friday sale 😁
LikeLike
Enjoy! I love mine.
LikeLike
Good luck and Happy Holidays!
LikeLike
Hi. There is a plastic knob but it is hear resistant. That plastic smell isn’t from the parts of the oven. It’s from styrofoam that wad left behind when they were unpacking it. So when it gets turned on for the first time it melts the little pieces of styrofoam that wasn’t cleaned out Ave it causes a horrible smell that lingers.
LikeLike
Hi-I have used my air fryer 2 times now and there is a terrible unpleasant smell coming from it..is this normal? Will the smell eventually go away and is the smell unhealthy for us to breathe in? I love the machine itself-but the smell is unbearable!
LikeLike
Hi. So that smell is burning styrofoam. When you removed the styrofoam packing a tiny piece must have been stuck to the coil. And when that burns out is absolutely awful. I can only guess that that ids went with the Omni they chose to put the packing on the outside. Look up and see if you see anything burnt to the coil. Then maybe take it outside and run it on very high heat. It will go away once it’s burnt off.
LikeLike
I wish there was more info on time and temperatures. Fried chicken in particular
LikeLike
Hi. I have a bunch of other articles and videos on time and temperature of different dishes, including fried chicken. 🙂
LikeLike
The manual has a couple of charts. I know some complain they didn’t get one. If you need one, just Google for it or go to the IP site and download a copy.
LikeLike
Why, when following the temp posted, everything becomes too overcooked and almost burned. This happens with air fryer recipes using the Vortex. What is happening?
LikeLike
Hi. What recipes are you following? If they are for the traditional oven then you have to convert it because the air fryer cooks faster at lower temp. Look at my article about converting recipes. Also, only place food on trays at the Mudge or lower position. Never the top.
LikeLike
I find that food is usually done before the time given for AF specific recipes that I follow from the IP AF site, but not to the point that they are burned. That’s why I’m glad I have the oven model so I can keep an eye on how it’s cooking. If it’s not the fault of the recipe itself, or where you place the trays as Lana mentioned, I would use a thermometer to see if the unit is actually heating to the proper temps. As a note, I’ve had a few instances where I’d set the temp for, say 350 and for some reason as some point the temp will jump to 400. When this happens, I usually hear one beep. I know it’s not supposed to happen, but I’m usually within earshot of the unit when cooking so I put up with the few quirks it has.
LikeLike
I have pet parrots. If I had know this could injure or kill them I would NEVER have purchased this product.
LikeLike
That’s why my first point, in which I wrote in red font, was that this appliance has Teflon.
LikeLike
Thank You Lana for Your Insight into the World of Vortex +!
LikeLike
You are so welcome! Happy cooking and stay safe!
LikeLike
santaberks@gmail.com
LikeLike
Is there any rotisserie skewers that works in the instant vortex plus 7 in 1
LikeLike
Hi. I have not found any that fit that size. One person told me they just used the one for the Omni and cut the skewers but I've never tried it.
LikeLike
Amazon sells some and I have heard people say they cut to fit like Lana mentioned. I wish ours had that feature, but at least we have the rotating basket that the Omni doesn’t.
Some people have gotten creative by using long bamboo skewers and have them go from side to side or lay on the trays.
LikeLike
Is there a basket available for the 10 qt. Vortex Plus 7 in 1?
LikeLike
Need cooking guide so dont over cook or uncooked
LikeLike